Monday, September 21, 2020
Monday, March 12, 2018
PAINTING & DRAWING HANDS Accurately
PAINTING AND DRAWING HANDS ACCURATELY...
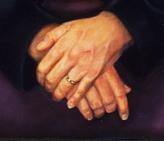 |
| Details from Judge Shubb painting by Bobbi Baldwin |
In order to paint hands correctly, it's important to first take into consideration:
- Where is the light source is coming from?
- We must first identify the light source and the direction in which it hits the hands. This will tell you where your hands need to have the lightest form of color.

- Next, we need to take into consideration the many different shapes within the hands and the bone structure.
- Each finger has a specific length relative to the other fingers around it.
- The middle finger has the longest bones and each one of the four bones are longer than the ring and pointer finger that share the space next to the middle finger.
- The thumb has one less bone and comes from near the wrist.

INTERESTING INFORMATION: Did you know that there are four bones in the hand for each finger and only 3 in the thumb? The bones are each 1/3 shorter than the previous one from the wrist to the fingertips. (This also applies to arms and legs. The large bone from hip to knee (femur) is 1/3 longer than the two bones we have from knee to foot. Also, this happens in the arm you have from your shoulder to your elbow and the two bones that go from your elbow to your wrist.)

Think of each finger as 3 sets of tapering cylinders (see illustration #1 & 3). Each segment bone is 1/3 shorter than the last segment. Cylinders are rounded in edge only. Therefore, think about how to apply shading to make the edges become gradually darker. The segments will also have a value change of their own that happens from the light source, being closer or further away, and the angles that each segment takes. In most situations there will be a consistency of the first segment of each finger being the same value as each other. The middle segment will then become
darker than the brightest. In between the values of the first and last segments of the fingers. In example, if the light is strongest on the back of the hand, the first segment of each of the four fingers will then be an overall shade darker than the back of the hand, and the second segment will be a bit darker than the first segment coming from the hand knuckles. Then the tip of the fingers will be the darkest over all. (See the illustration #4 and below cropped painting of hands together.)
 |
| Copyrights are reserved for all written and images included here, by Bobbi Baldwin 2018. No use whatsoever is permitted without written permission from the artist. |

Illustration # 3 shows that the overall shape of fingers is different in some people. Typically (but not always) a man’s fingers are more squared and blunt in shape. A woman’s fingers are a continual tapering shape, getting thinner at the tip. Men’s fingers do taper, just not as much.
When foreshortening* a finger, you must always create brush strokes and contour color changes that follow the rounding shape of the fingers, gradually getting lots of value change from front to back. (See illustration #6)
When we paint hands one of the most important things is to remember to paint around the hands as much as within the hands. (Illustration #5) I cannot count how many times, I have come to a student’s painting and discovered they have been trying so hard to make their hands look good and struggled through the process, never being happy. I come in and paint the negative space around the fingers and it’s like magic, the hands look great. I didn’t do all the work on the contour shaping of the skin tones, but they did. The negative spaces around the hand make the shading work, until we have that in, they look unfinished and not quite right. Also, that negative space between the fingers helps you to identify the shapes of the fingers even better.
Illustration #7 shows the fingernails. When we paint the fingernails, we need to keep into consideration that the nail is shiny. It also has a pale half circle of color under the base of the fingernail. Where the cuticle comes over the fingernail, there will be a tiny cast shadow and then the cuticle will have highlights representing the rounded edge of the skin as it curves into the where the fingernail lies below. When you are painting a foreshortened finger or a finger that is pointed towards you and you see the tip first, there will be a shadow under the fingernail as the fingernail grows past the tip of the finger. This should be easy to represent with the shadow and then the highlight of the end of the tip of the fingernail making a small rounded edge. (See illustration # 6)
Use lines to represent the wrinkles at the joints when you can. (Illustration #7)

EXERCISE: Draw your own hand! And keep drawing it until you get really good.
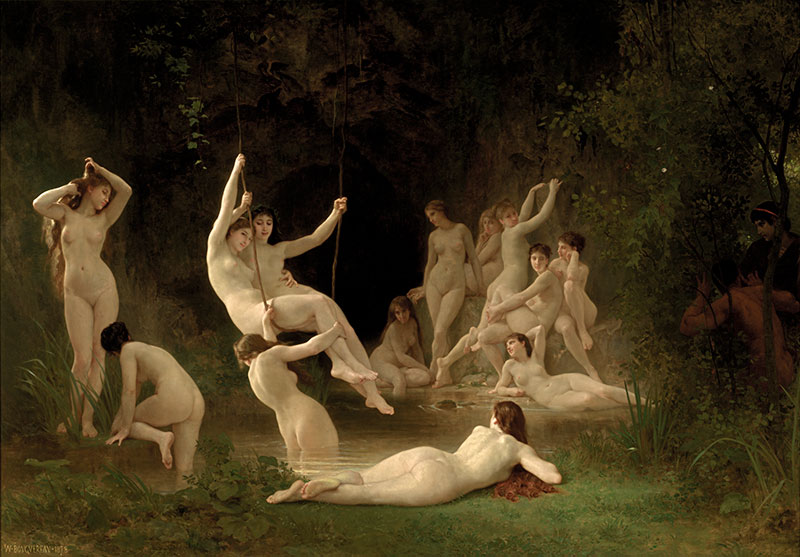
NOTE: Take a trip to Haggin Museum in Stockton. Be sure to spend a lot of time in front of William Adolph Bouguereau's painting of the "Nymphaeum". No one does hands and fingers better than he does!
Here is a funny post from Facebook that I thought I would share with you, as it has to do with hands. It was posted by:
Ray Johnson
The History of the Middle Finger:
Well, now......here's something I never knew before, and now that I know it, I feel compelled to send it on to my more intelligent friends in the hope that they, too, will feel edified.
Well, now......here's something I never knew before, and now that I know it, I feel compelled to send it on to my more intelligent friends in the hope that they, too, will feel edified.
Before the Battle of Agincourt in 1415, the French, anticipating victory over the English, proposed to cut off the middle finger of all captured English soldiers. Without the middle finger it would be impossible to draw the renowned English longbow and therefore they would be incapable of fighting in the future. This famous English longbow was made of the native English Yew tree, and the act of drawing the longbow was known as 'plucking the yew' (or 'pluck yew').
Much to the bewilderment of the French, the English won a major upset and they began mocking the French by waving their middle fingers at the defeated French, saying, See, we can still pluck yew! Since 'pluck yew' is rather difficult to say, the difficult consonant cluster at the beginning has gradually changed to a labiodentalfricative 'F', and thus the words often used in conjunction with the one-finger-salute! It is also because of the pheasant feathers on the arrows used with the longbow that the symbolic gesture is known as 'giving the bird.'
And yew thought yew knew every plucking thing. Didn't yew!!
Monday, September 7, 2015
Day 31 - and the project summary
Day 31 - Christine Crick


Christine works in veterinarians offices. She wore her scrubs for this painting because she just got off a long shift. What a sweetheart she is and it was a delight to paint her. She is my cousin's partner. Steve is the first son of my first cousin, also by the name of Steve.
A few things briefly which come to mind when I think of this
project:·
I loved having a new
friend come every day. I loved not having to talk but doing what I do
best, observing their faces. It was such a delight and I looked forward
to each person, every day. And everyone was a delight, such good sports, and
wonderful to paint. Muffin misses everyone. I think she is still
pouting that my friends aren't coming over daily for her to greet.
Subscribe to:
Posts (Atom)